

The original idea behind Maille was to provide a mesh
of metal that a warrior would wear to prevent penetrating weapons such
as swords or spears. Modern day uses for Maille include butcher's
gloves and aprons, and shark suits worn by SCUBA divers when diving with
these animals. A couple of characteristics that maille has however,
make it fun to incorporate into jewelry designs. First, when you handle
some maille, the first thing you notice is that it is fun to touch,
because of its unique ability to sort of roll off of your skin. In
other words, the mesh is just plain fun to play with. The second
characteristic is that the mesh creates a repeating pattern that is
pleasing to the eye. It can be used to make bracelets, belts,
necklaces, and many other types of adornment. It can be made from just
about any metal that is flexible enough to bend as well. When I was
attending college, I was interested in medieval history, and in
particular, weapons and armor of the time, so I researched and learned
how to make maille. For a while, I made steel belts and bracelets and
consigned them at a local trendy store to make a little extra cash, but
sort of quit doing it once I was finished with college. This being a
metalworking site, and maille being the sort of metalwork that could be
incorporated into jewelry designs, I decided to create an online class
that demonstrates how to make it.
Supplies and Tools
Examples
Steps
of metal that a warrior would wear to prevent penetrating weapons such
as swords or spears. Modern day uses for Maille include butcher's
gloves and aprons, and shark suits worn by SCUBA divers when diving with
these animals. A couple of characteristics that maille has however,
make it fun to incorporate into jewelry designs. First, when you handle
some maille, the first thing you notice is that it is fun to touch,
because of its unique ability to sort of roll off of your skin. In
other words, the mesh is just plain fun to play with. The second
characteristic is that the mesh creates a repeating pattern that is
pleasing to the eye. It can be used to make bracelets, belts,
necklaces, and many other types of adornment. It can be made from just
about any metal that is flexible enough to bend as well. When I was
attending college, I was interested in medieval history, and in
particular, weapons and armor of the time, so I researched and learned
how to make maille. For a while, I made steel belts and bracelets and
consigned them at a local trendy store to make a little extra cash, but
sort of quit doing it once I was finished with college. This being a
metalworking site, and maille being the sort of metalwork that could be
incorporated into jewelry designs, I decided to create an online class
that demonstrates how to make it.
Supplies and Tools
- Strong side cutters, or a jump ring making setup.
- Vise grips.
- Two pairs of sturdy pliers.
- Gloves.
- Steel dowel of the diameter you wish your rings to be.
- Wire.
 | You will need a sturdy pair of side cutters. I bought this pair years ago at Walmart for about $3.00 after first trying several different name brands. Each of the name brand cutters' tips broke after about 100 rings were cut with them. They need to have very strong tips, as that is the only part you really use for making chainmail. If you are using a metal other than steel, you will probably want to use a jeweler's saw or a jump ring maker for cutting rings so the ends are neater. |
| This is another $2.00 to $3.00 item you will need. Again, you won't need a name brand. |  |
 | You will need a couple pairs of pliers. When making chainmail from steel, I use two pairs of needle nose pliers with teeth, as the steel is hard enough to bend to require a better grip. When using precious metal, you can probably skip using pliers with teeth. |
| You may want to use a glove when winding the rings. |  |
 | I have found that the type of steel dowel that can be obtained at your local hardware store for about $2.00 works great for creating the rings. I believe that this one is 5/8 inch in diameter. I have also used 1/4 inch diameter before. You could use any number of other cylindrical objects in different diameters if you desire different sized rings. |
| The wire I used for these rings is 12 or 14 guage electric fence wire. It is galvanized, so it won't rust. Depending on the size of rings you want, you can use various sizes of wire. As I said before, You can use any metal for this you want. |  |
Examples
 | This and the next few pictures are examples of chainmail projects in progress. This first one is a coif that is not finished. A coif would be worn over a padded skull cap and is designed to protect the head and neck. Notice that the pattern in this is larger and larger concentric circles. |
| This is a close up of the standard 4 in 1 pattern typically used for chainmail. |  |
 | Here is a partially completed shirt of chainmail. It is approximately 1/3 finished if that, and it has about 5-6000 rings. When finished, it would weigh about 50 pounds. |
| This piece is made from premade brass jump rings. | 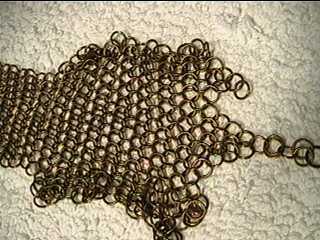 |
 | The first thing you need to do is to cut off a piece of wire appropriate to your needs. The piece I used here is about 8 or 9 feet long. Your next step is to bend the end around your dowel so the curve of the wire matches it. |
| Next, adjust your vise grips so that they will hold the wire tightly to the dowel. |  |
 | Next, put on your glove, and brace the dowel against something solid. Using your thumb to guide how the wire lays down, begin spinning the dowel using the vise grips for leverage. Try to create a uniform spring without gaps if you can. |
| Spin the dowel until all of the wire is wrapped. |  |
 | Slide your spring off of the dowel. |
| cut off the end where the vise grips held it to the dowel. |  |
 | If you are using a jeweler's saw, you will start cutting off rings here. Try to keep the blade as close to the end sticking out as possible to create uniform rings. |
| When making steel chainmail, I use side cutters. Side cutters generally have the blade closer to one side than the other. I press the side with the blade against the previously cut end to make the most uniform rings. Snip off only one ring at a time for consistancy. |  |
 | When cutting steel, you may find your hand getting tired pretty quickly. It takes quite a bit of pressure. |
| Here I have finished the entire spring, and am ready to move to the next step. When I got to the end, I trimmed off a small unusable portion. |  |
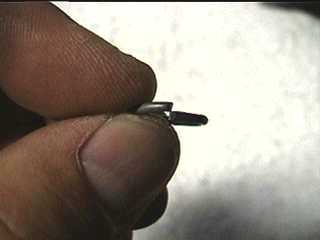 | This is what the each of the rings should look like. |
| Using your two pairs of pliers, you should spread open some of the rings. |  |
 | For the others, you should grasp each end with a pair of pliers, and then push the ends past each other to create a slight springiness. After this, pull them back and line up the two ends. |
| Check to make sure that ends are closed, and try running your finger over the gap to check to see that the ring doesn't have any catches. | 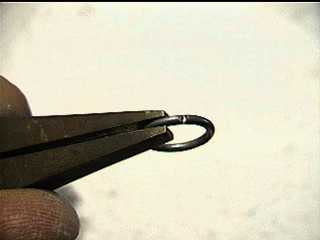 |
 | You can use the needle nose pliers to correct roundness and alignment. |
| The first pattern we will do is called 4 in 1. It is probably the most common and traditional style. Once you have made rings of both types, select one open ring and 4 closed rings. |  |
 | Hang all four closed rings on the open one. |
| Close that ring in the same manner that you closed the others, including checking for alignment and roundness. Lay it down like this. |  |
 | Next, get one more open ring and two closed rings, and hang the closed ones on the open ring just like you did before (of course this time you only have 2 hanging). |
| Pushing the hanging rings to the side, hook the open ring through the end two closed rings. Make sure when you do this that the open ring will be laying in the same position as the first center ring once you close it. Close this loop as before. | 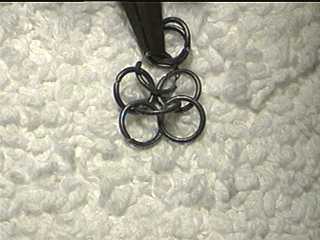 |
 | This is what it should look like when you lay it back down and arrange it. Note that the outside rows are angled one direction, while the middle row is angled in the opposite one. |
| continue this pattern until you have a piece of chainmail as long as you like. At this point, you could make it into a bracelet or something else, but if you want to make it into a sheet of chainmail, read on. |  |
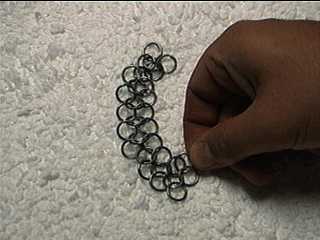 | Start on one end, and using an open ring, hook it through two of the closed rings, making sure that when you close the ring, it will lay like the original center row. |
| Move one ring farther, and repeat this process. |  |
 | Repeat this step again and again until you reach the end. |
| Now there are four rows. The more rows you have, the more it will hold its shape. |  |
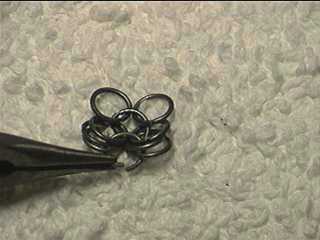
 | Next we will do 8 in 1. You can also do 6 in 1 if you want, but the concept is the same. The more rings you put through each center ring, the tighter it looks when done. Here I have looped 8 rings on the first open ring. |
| Just as before, arrange on a surface so the rings lay like shown. |  |
 | Grab an open ring and loop it through the last three rings on each side, making sure that when you close it up, it will lay in the same direction as the other center ring. |
| Add two more closed rings to this, and close up the ring. | 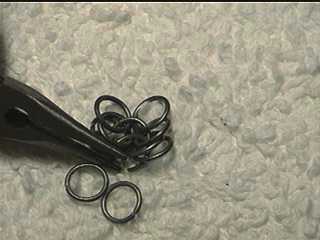 |
 | Lay it back down, and arrange it this way again. It should look like this. |
| Again, loop an open ring through the last 6 rings and add two more before closing it. |  |
 | It should look like this now. |
| Repeat this process until you have a strip of chainmail of the size you want. You can make multiple rows in just the same way you did on the 4 in 1 pattern if you like. |  |
 | I've found that the 8 in 1 pattern makes an almost snakelike strip of chainmail which works well for belts and bracelets. Enjoy experimenting with this technique |